My goodneess it sure has been a long while since I posted here. I suppose life just got busy, and adulting took over. It has been a whirlwind of a year, and I am coming to realize that I have really stopped focusing on myself too much. Not sure how or why, but I got into a self depricating rut, and now, it's time to get past it. I have gained a lot of weight, and I am not happy about it!
I decided back in February to start really focusing on my health again, but I haven't been able to lose any weight. In fact, I have GAINED 14lbs since then. To say I am frustrated is an understatment. All the while, trying to help my children understand that I want to be healthy.....yet they both know I am ashamed of my body. It has effected my married too. As if being apart from my husband wasn't hard enough, I don't enjoy sending him sexy pics when we are apart. When we are together, I just feel dumpy and awkward. I have stepped up my workouts, but sometimes, working 12hour shifts makes it difficult.
I realized yesterday that I really need to start cracking down on my nutirtion. I can't say that I have been eating terribly, but I could do better. So, I have decided to start writing about my weight loss journey. Totally cliche, I know, but it is a struggle. My family has a bad history of obesity, diabetes, heart disease, and more. I want my words to one day empower my own child to be strong in their choices.
So, all that said. Today was hard! I got up this morning with a renewed sense of self, only to discover I had nothing that wasn't processed and full of carbs, so I skipped it. I am watching a friend's dogs while she is out of town, so I grabbed my shopping list and decided I would head to the store as soon as I was done with them. But, things took me longer than I had expected becuase those dogs are so dang sweet! With good intentions in hand, I set off! I didn't do too bad actually, with the exception of some popcorn that I really like. I also made a turkey sandwich today, substituting the bread with a cucumber. I'll have to take a picture of it. For now, tomorrow is a new day.
Monday, June 18, 2018
Monday, January 9, 2017
Braided Crochet Slouchy Hat, English Tutorial
I love my friends and family! I love how they are always tagging me and sharing with me posts that they feel would help me draw inspiration. Just the other day, a friend of mine tagged me in a post from pinterest.

I wish I could properly credit this photo (so if you know where it originated from, let me know), but the website it led to wasn't in English. I tried to follow another link on google, but my computer wouldn't open the page, saying that it was not a secure page. I saw this as a fun challenge! I set out to find a pattern in English, but kept hitting one road block after another. I was able to find a website that google would roughly translate that showed me how to create the stitch, but it was for a sleeve on a crochet coat, so there was a lot of decreasing, and I couldn't read most of the written instructions.
This then led me to a youtube video, but it was all in spanish. The good news is, when I put it on mute and concentrated on her stitches, I was able to figure most of it out. I had a spanish speaking friend confirm that the starting chain was created in multiples of 4, and I was set to go! If you want to see the video, have a look:
If you have a chance to look at the facebook page of the lady that created this video, you should! Sayen's Crochet. She has some amzing talent!
Anyway! After seeing some people on pinterest asking where the English version of this pattern, so I decided I would do my best to share with you all the pattern in English. If I missed something, or if you have any questions, let me know. I am fairly new to pattern writting!
What you will need:
Worsted weight yarn: for reference I used 2.5 skeins of Big Twist Premium in Almost Aqua
Size H hook
Needle
Medium or large Pom Pom maker
Abbreviations:
CH Chain
SS Slip Stitch
SC Single Crochet
DC Double Crochet
FPDC Front Post Double Crochet
BPDC Back Post Double Crochet
TOG Together
RS Right Side
WS Wrong Side

First, start off by chaining 64, then join your chain with a SS, careful not to twist the chain.
Row 2: SC in each chain around. join to frist SC with a SS
Row 3: CH 3, then DC in each stitch around. **Your Chain 3 does NOT count as a stitch, so place your first DC in the same stitch as your join** join with a SS to the first DC

Row 4 and 5: CH 3, then *FPDC in the first 2 DC's from the previous round, next, BPDC in the next 2 stitches* Repeat from *. Join with a SS to the first FPDC. Note: Do not worry if you end in a FPDC, this hat will slouch in the end and hide the back of your ribbing

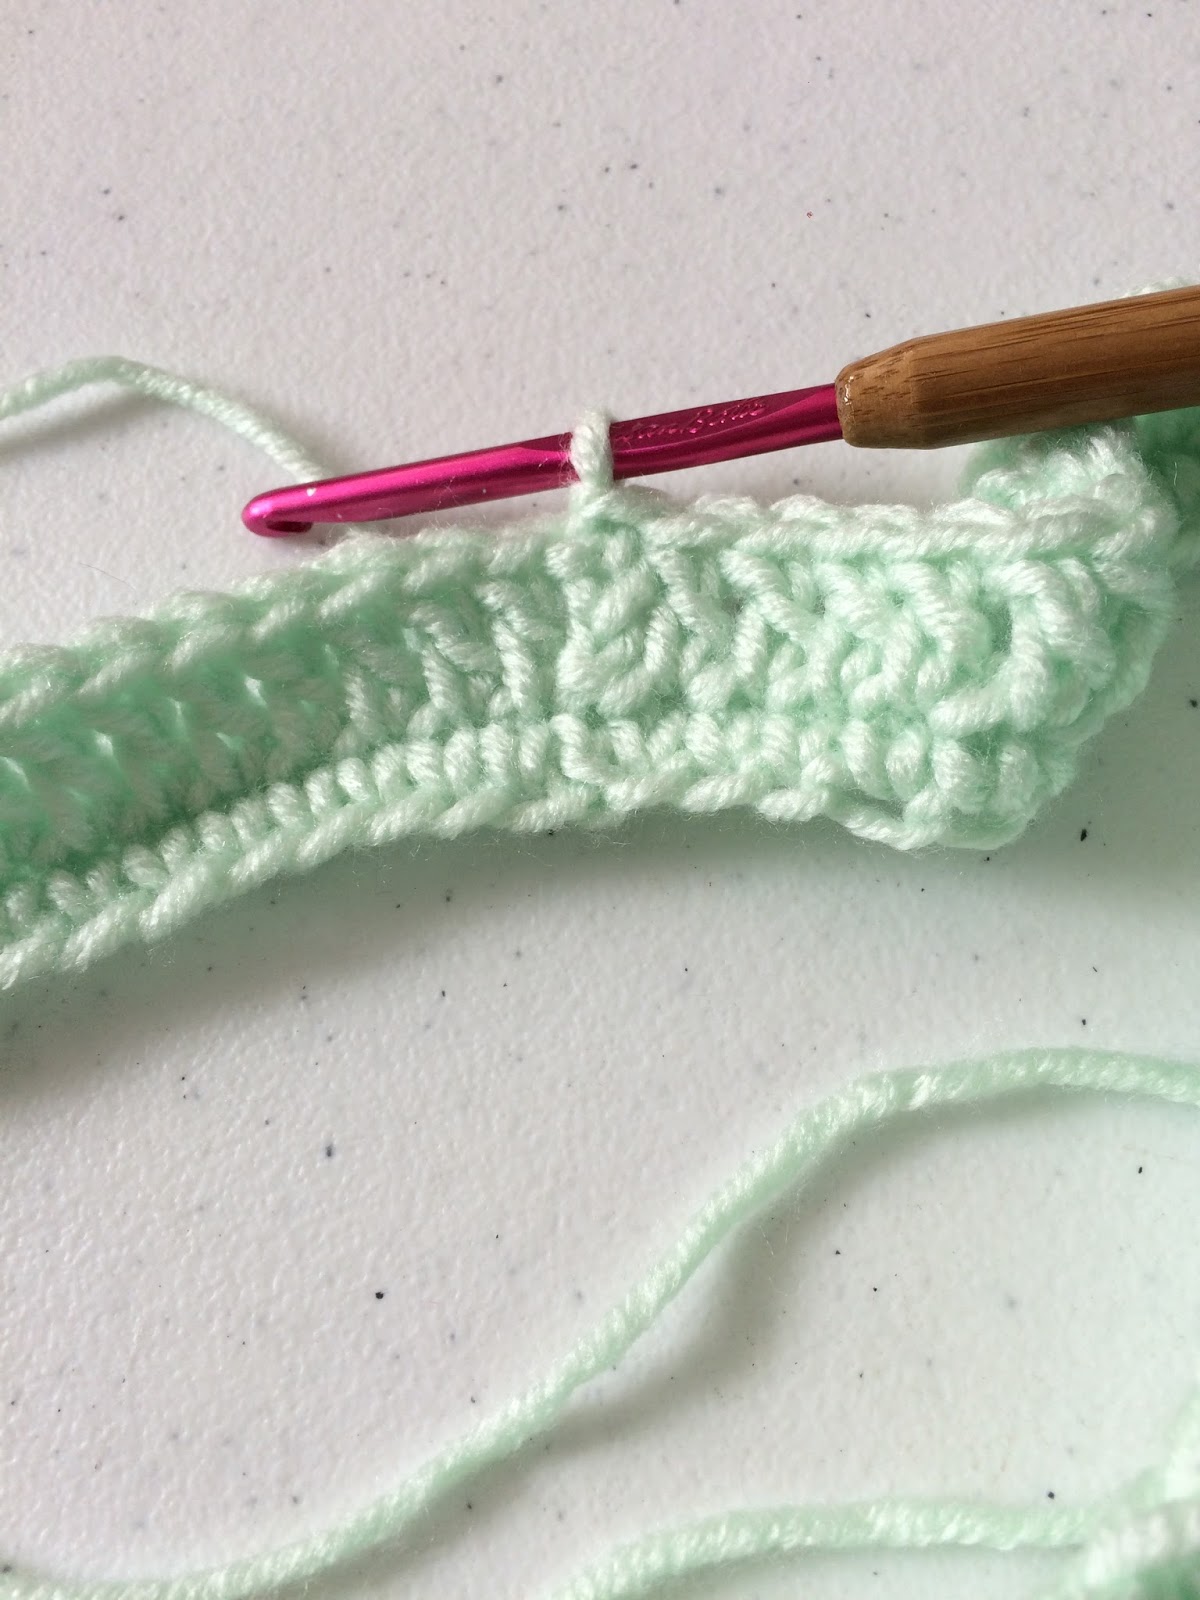
Row 6: This row sets you up for your braid stitch. You are going to CH 3, turn so the RS is facing, then *3 DC, CH 1, Skip 1,* Repeat from the * and end with a SS to the top of the CH 3. You should have 14 3DC groups. Note: The chain does not count as a stitch so your first group will look like 4 DC's as seen in the photo above.

Row 7: The photo above as well as the next 4 photos will help show you what you are doing. CH4, skip the first 3 DC group, and 3 DC in the chain 1 space from the previous round.

Then, you are going to *FPDC 3 TOG around the middle DC in the 3DC group. This is where I am pointing in the photo above. Then, CH1

Skip the next 3 DC group, and 3 DC in the CH 1 Space* repeat from *

When you reach the end of this round, you are not going to CH 1 in your final FPDC 3TOG. Instead, you are going to SS in the 3rd CH in your CH 4, where I am pointing to below. You want to leave the 4th chain as your CH 1 space.


Row 8: I hope you are still following, becuase this is where it starts to get a little confusing. However, once you figure it out, the rest of the hat is a piece of cake! You will see above, that for Row 8, I am looking at the inside of the hat, This is becuase after you make your CH 4 for this round, you are going to turn your work. This is really imporant. We are not working in straight out rounds, we are turning our work with each row. Odd numbered rows, we will be looking at the outside of the hat, or the right side, RS. Even numbered rows, we are looking at the inside, or the wrong side, WS.
So, with the WS facing, you are going to skip the first 3 DC grouping, and 3 DC in the CH 1 space from the previous round. This should sound familiar since we just did the same thing in row 7.
BUT, now we need to turn our work facing the RS so we can have access to the front of the 3 DC grouping in the previous round. I have that pictured below:

So to recap, I started this round with the wrong side facing. I made a 3DC group in the CH 1 space, then I turned my work so that the front side is now facing me.

Now, you are going to need to find the center of the 3DC group from the previous round. Your FPDC 3TOG, started to create the braid, so your 3 DC group will be hiding behind it (see photo below). This is where you are going to put your FPDC 3 TOG for this round.

I have put my hook in the middle of the 3 DC to show you were you are going to find where to FPDC 3TOG

In reality, your work will probably look sideways like this photo I totally meant to leave facing sideways ;) But really, your work should look something like this. You are now going to turn your hat again, so that you are now looking at the WS.

And then you are going to 3DC in the next CH 1 space. Your 2nd set of braids will start to lay flat. It will also lay in the opposite direction as round 7.
Cliff's Notes: CH 4, turn your work to the WS. Skip the first 3DC group, and then 3DC in the CH 1 space. Turn your work so that the RS is facing, and *FPDC 3TOG in the middle DC of the 3DC group in the round below, CH 1, turn your work to the WS skip 3DC, 3DC in the CH1 space, turn to the RS* repeat from *Join with a SS to the 3rd CH in the CH4 at the start of the row.

Wrong side

Right Side
You are now going to repeat rows 7 and 8, 11 more times. You will not be decreasing at all, so your work will look like a big tube, like this:

You are going to turn your work inside out, and cut of a long tail to finish off your final round. Weave the tail in and out of the top of your hat, then pull it together to cinch it shut. Weave the tail in and out of the top of the hat to reinforce the cinch.

Finally, use your pom pom maker to make a pom pom, and attach it to the top of the hat.
If you made it this far, you are awesome! It did take me a while to finish off this hat, but I am in absolute love with the look of it! I really wish I had a model today to show you the end result on top of a head, but trust me, it is gorgeous! It did take me a while to figure it out, and the hat took a few hours to make, but I think that now that I have figured it out, it will work up much faster! I am excited to make more of these.
Have a Sassy Day!
Monday, December 19, 2016
Condensing, decluttering, and renewing, OH MY!
I am not the person who likes to hold onto stuff. Stuff, in general, doesn't have a lot of meaning to me. Now, there are things that may represent a moment, or gifts that were given becasue someone thought of me. That stuff I don't mind. However, I have found myself overwhelmed with things. I tend purge my home. I will go through it like a crazed tasmanian devil pitching everything in my path. I don't stop to think about the things I am tossing into the donation bin, and instead, just go with it. Then, sometimes months late, I sit there scracthing my head wondering where that thing went that I really need in this moment.


I found myself overwhelmed with just stuff. I have never been one to get too caught up in consumerism, almost everything I own is second hand, but I have found as the years have gone by, that decluttering has been at the bottom of my priority list. My son hasn't played with Thomas toys for 2 years now, yet there they all sit, still waiting to be played with in the basement. It just became too much. I had become really good at hiding the stuff because I had no idea where to start with getting rid of it.
Then, the other day, I had a couple of quick projects to finish, so I put on Netflix for some background noise. I chose some random documentary that I didn't expect I would pay much attention to. It was called "Minimalism". This is not an all together new concept by any means! Though the people in the film were a bit more extreme than I am ready to be with their minimizing, I found myself 100% sucked in. So was my daughter. She was just sitting there saying how much she loved this idea!
Then, this woman told her story and touched on her 333 concept. This was to wear 33 articles of clotheing or less for 3 months. This included shoes, jewelry, and other fashion accessories (hats, sunglasses, scarves, etc.).This is where Haliegh went kind of crazy. She says "Let's do this mom!!" There was a bit of an awkward silence here as the throughts were processing through my head. Then it hit me, this could be PERFECT for Haliegh. She is currently working with the school and a psychitrist to test for ADHD. She easily gets overwhelmed, and she ends up with waaaaaay more laundry than she has time to do. She becomes obsessed about if her shoes are matching her shirt, and if it's ok to wear jeans with a particular blouse. This really could be the perfect start to decluttering. I agreed (and then I maybe had an oh shit, what did I just agree to moment).
Today came, and we began the process. You see, what I am learning is that, minimalism isn't about just purging everything in your path, It is a process that takes thought, consideration, mindfullness. In our case, we live in a climate that sees some extreme weather. Today for example, our high was 4 and it felt like -11. This summer, it could be 100 degrees warmer than it is now. That means, we needed to lay our own ground rules so that we weren't stuck wearing winter attire during extreme heat. Here are what we came up with together:
- We get 1 coat, hat, glove/mitten pair, and scarf as a freebie. Anything after that counts towards our 33 items.
- There are a few items in our closets that we still sometimes wear, and a few we don't, that hold meaning. This included my high school band jacket, my class hoodie, the shirt Rich and I designed and wore to our Disney races and the Minnie Mouse shoes Rich gave me to run the Disneyland Half marathon. For Haliegh, it was a shirt she earned from a cheer camp, a few onsies myself and some family decorated before she was born, and her softball camp shirt. We allowed these to stay becuase these are things that hold sentimental value to us. These are things we earned. They do not count towards our 33.
- My engagement and wedding ring and jewelry gifts do not count. Rich has given me some beautiful necklaces, and recently, one of my sisters gave me a necklace and bracelet that I adore. These are not the types of items you just donate. Haliegh has a beautiful Pandora style bracelet from my mom, it is one of her most prized possesions. They do not count.
- After the 3 months, we will go through the 3 huge totes and 2 luggage bags full of clothes to reevaluate (yes you read that right. Between the 2 of us, we really did have that much). The weather will start to get warmer by then, so we will need to change our wadrobe a bit.
- During the reevaluation process, we will stick with 33 winter items, but we can swap out articles if we so choose. Everything else will be donated or sold.
- If we are given clothing as gifts for Christmas or Birthday's we can swap out some old stuff for the new stuff.
This all seemed fair enough, until we set to work. At first, it was exciting! 2 years ago I ran a 1/2 marathon and a full marathon back to back with Rich, then later that year another 1/2 marathon. I've gained some weight since then and most of these clothes were screaming at me to get my butt in gear. I have been, but I don't want to feel bad about myself while doing so. I started quickly realizing that it felt really good to get rid of so much clothing. I have 3 sections in my closet, and one of them I haven't even touched since June!
As I narrowed eveything down to one section, Haliegh was asking "do earrings count as 1 item or 2? What about extra gloves?" Valid questions, they count as 1. As she came closer to narrowing down to her 33, I began to almost panic a little. Holy shit....33 items isn't a lot! 2 pairs of boots, one black one brown, 2 pairs of yoga pants, "oh but wait, I could get away without counting these since I can technically sleep in them too." Then then other half of me chastises "Of course you can, but you know damn well you wear them more than anything else in your closet" Now I am at 4 items. Tennis shoes, 5. Shirts to work out in, 6, 7, 8, 9, 10. Two pairs of jeans, 11 &12. A hoodie for cool but not burn your face of cold days, 13. This was incredibly hard! I really had to stop and think about the things I need vs. want and learn to layer well.
Haliegh quickly figured out her 33 and came into the room to chat with me while I tried to narrow mine down. It got to a point though, where I couldn't have her in there talking. I need to concentrate on not giving up. To her, this was really important, she got her closet down to 26 items and was so proud of that. I was proud of her too, but I had to focus. One of the things that really got me through was thinking about Rich moving in in the not too far off future, and needing room for him. He has said in the past that he doesn't know where all of his stuff will fit, and I told him I would make the room. Here I was, making room. That felt good! That got me through. After an hour of narrowing down one section, I had it figured out. My 33. Here goes nothing!

This section now houses some jewelry I have set aside that are not in my 33, shoes, clothing, and a few items that were allowed to stay such as my band jacket.

This is my 33

There is something freeing about this photo. Look at all those empty hangers! Those were once full! It did break my heart to put aside my Dr. Who boots though. Those were a gift from Rich, but I have literally worn holes in them. I have only worn them once since the weather turned cold. It came down to those, or a pair of hard soled house slippers that can also double as boots to run to the store with. Practicality won for this experiment.
Tuesday, December 13, 2016
Blingy Socks
I have been working on a HUGEMUNGUS order of beaded bobby socks. I struck a deal with a neighbor. You see, I hate....no....loathe yard work. Really, I will scrub toilets all day if I don't have to mow the lawn. It just so happens she enjoys yard work and needed something special for baby shower gifts. 2 ladies in her life were expecting little girls, and after showing me a photo of some beaded bobby socks, I knew I could make them for her. She requested 2 dozen socks in return for mowing my lawn until the first freeze. Done deal!

I have been working on these socks for a couple of months now in between Etsy orders. I have fallen in love with the look of these socks, and I wanted to share with you how easy they are to create. These socks are meant for photo props only, under supervision since they are made with beads. Here it is! One of the easiest projects you will ever create!


I have been working on these socks for a couple of months now in between Etsy orders. I have fallen in love with the look of these socks, and I wanted to share with you how easy they are to create. These socks are meant for photo props only, under supervision since they are made with beads. Here it is! One of the easiest projects you will ever create!
What you'll need
*Aunt Lydia's crochet thred
*1.5mm crochet hook
*Bobby Socks (these are gerber brand)
*beads of any sort

Aunt Lydia's comes in a varity of colors that you can use to match your socks. It is small enough for the beads to slide onto easily, as well as small enough to fit through the gaps of the knit on the bobby socks.

A small hook is perfect for pulling the thread up through the gaps in the socks

Bobby socks are exactly what you need for this project. They are knit, which means the lines you can see visibly will have little gaps where you can insert your hook.

Colorful beads of any sort that will easily slide onto your thread. You can get creative too! I was given some beads to you, and I picked up a few of my own as well. Big, small, and everything in between.

Now, lets get started! The first thing you will want to do is string the beads onto the crochet thread. You should add about 20 beads for one sock. I always add a little more.

When you unfold and stretch the sock, you will see the little gaps I have been speaking of. You will want to make sure you are not crocheting around the top hole. You want to reinforce it......

That means you will be inserting your hook in the 3-4 gap down from the hem.

You are going to attach the thread to the back of the sock, then chain. The number of chains is up to you. The more you have, the longer the bead will lay on the sock. In this instance, In this case, I used 6 and 3 chains.

Next, you are going to pull the first bead towards your chains. I like to measure the loop I will create by pinching the 6th chain with the top of my thumb, and holding the bead about mid thumb to make a loop. You are going to slip stitch into the 6th chain to make the loop that the bead will lay in, then chain 6 more.

Here is the loop

Then, you are going ot stretch the sock enough for you to see the gaps, and you are going to slip stitch into the fourth gap from your previous join. Next, chain 3, and repeat the loop, chain 3, and slip stitch again into the fourth gap. This will create a verigation in the beads. You will repeat this all the way around the hem of the sock, and tie off when you are done.

Here is the finished prodct. See! It is really freaking simple! All you have to do is chain, slip, and create that loop.
Here are some examples of some of the other socks I have made. Once you figure out how to make them, you can do all sorts of fun things! I have experiemented with fun fur, as well as crocheting through the beads rather than stringing them onto the thread first.

Fun fur turned out to look like Tinker Bell

These are triangle shaped beads that I crocheted around rather then stringing onto the socks I was able to get this wavey shape by crocheting in every gap rather than skipping 3.


I hope you enjoyed this quick tutorial! If you have any questions, please let me know. These make fantastic baby shower gifts!
Wednesday, November 23, 2016
doTERRA BOGO Wednesday!
Spoiled. That is the only word I can come up with at the moment for how doTERRA showers everyone with love. They literally spoil us guys! Today's BOGO deals are oils that every single person needs in their home. It doesn't matter if they are skeptic, believer, or somewhere in between. You all need these oils.


If I were to create a top 5 list of my most favorite oils, Melaleuca would hands down make that list! From the book, The Essential Life, "With 12 times the antiseptic power of a phenol, Australian Aborigines have used tea tree oil for centuires, often crushing leaves in their hands and inhaling the aroma for colds and illnesses," Most people have heard of Melaleuca referred to as tea tree oil, often finding it in their hair care or skin care products. This oil is steam distilled from the leaves, and it's top properties include:
*Antiseptic
*Antibacterial
*Antifungal
*Anti-Parasetic
*Antiviral
*Decongestant
Let me touch on the anti-parasetic for just a moment, becuase this is what made me a believer in this oil. My daughter came home from a sleepover, and a couple of days later had an itchy, crawly head. Melaleuca combined with olive oil over night on her hair did the trick. We used many other forms of treatment to no avail, but this oil, plus the slickness of the olive oil, helped rid her head of all the itchy crawlies. This made me a happy mom, becuase those things give me the heebie jeebies!
Since that time, I have come to discover that Melaleuca has close to 50 other uses! This is huge, becuase I know when my family is in need of soothing or support, this is the oil I will most often turn to. I use it daily in my shampoo, as well as adding it to my moisturizer every morning. Melaleuca can be found in doTERRA's Breathe blend, so you know what that means!?!? It is great for respiratory support. If you are someone who suffers from dry, blotchy skin, or burning red feet, Melaleuca may be able to help. If you find yourself with discomfort in your throat, you can rub this oil topically right over your neck and chest to help soothe the pain. You can add it to your toothpaste to support healthy teeth and gums.
Emotinally, Melaleuca is know as "The oil of energetic boundaries". What does this mean to you? Well, it helps to clear negative baggage. It releases toxic relationships with people, microorganisms in the physical body, or spiritual beings. You may feel drained of life force and energy, but Melaleuca is here to help you break those negative ties, allowing new, healthy connections to be formed that honor your boundaries. It allows you to recognize parts of yourself that allowed these negative relationships to exist in the first place. If you need help setting boundaries, standing up for yourself, or often feel responsible for other people's problems, using Melaleuca over your pulse points and heart on a regualr basis can help bring positivity and respect back into your life.

Marjoram, also know as "Joy of the Mountains", symbolized happiness to ancient Greeks and Romans.It is steam distilled using the leaves, and is found in doTERRA's AromaTouch, and PastTense blends. It blends well with Lavendar, Rosemary, and Ylang Ylang, and it's top properties include:
*Antispasmodic
*Digestive Stimulant
*Antibacterial
*Antifungal
*Sedative
I wish I would have known about this when Haliegh was a baby. She was colic and had MSPI, and I can tell you that life was really rough. My head pounded all the time, and seriously, this could have been a great oil for the both of us! If you have a baby that is experiencing this, add some Marjoram with some FCO to a roller bottle, and roll that sucker right over their abdoman. If you have head discomfort from lack of sleep, or tension, rub a few drops into your temples. I can say that this is not my most favorite smelling oils, but I would have tried anything back then without question!
If you experience muscle cramps or discomfort in your wrist or joints, you can pair Marjoram with peppermint and lemongrass for a really wonderful soother! A great tip passed down to me was, after using about 2/3 of a bottle of doTERRA FCO, add 40 drops of each. This is a mixture you want to try frequently for a couple of weeks. Some oils you feel the effects of right away, and some oils take a little longer. Everyone reacts differently, so give yourself time to allow the oils to work their magic.
As with many other oils, this is great for respiratory support and is also considered a calming oil.
Emotinally, Marjoram is known as the oil of connection. This oil aids those who are unable to trust other or form meaningful relationships. It shows the barriers someone has formed to protect themselves by unconsciously sabotaging long term relationships. Marjoram teaches that trust s the basis for all human relationships. It assists an individual in increasing their warmth and trust in social situations. It softens the heart and heals past wounds.
As always, if you have any questions about oils, please let me know! I would love to hear the ways you use these oils if you already have them. If not, let's chat! I'll hook you up.
Tuesday, November 22, 2016
doTERRA BOGO Tuesday!
I have been neglecting the blog a bit lately, but for good reason! My sister is about to have her first baby, and I have been working like crazy to get things made for my family since I am going home at the beginning of December.


BUT
LET ME TELL YOU!!!
I AM SO FREAKING EXCITED THAT IT IS BOGO WEEK!
Whew! I just had to get that out. I missed yesterday's BOGO post, but I did do a live facebook video about the oils that were offered, Cypress and Lemongrass. Today, I decided that I had better get on the ball and tell you about Douglas Fir and White Fir. Both of these tree oils have so many benefits that could help you both physically and emotionally. They are both woodsy in scent, and yet subtle.

Douglas Fir is steam distilled from the needles and branches of the Douglas Fir tree. Considered to be the classic Christmas Tree, the Douglas Fir tree was used by Native Americans in the Pacific Northwest to heal a wide variety of ailments. doTERRA Douglas Fir is sourced in New Zeland. This tree is considered a noxious weed in New Zeland, so doTERRA and the New Zeland government have come up with a solution! Watch this video to learn more:
It's top properties are:
*Antioxident
*Antiseptic
*Laxative
*Sedative
*Stimulant
And so much more! If you are suffering from constricted airways or sinus issues, you can apply it topically to your chest or bridge of your nose. Douglas Fir supports healthy respiration, and promotes healthy airways. If you are experiencing brain fog, Douglas is your man! Diffuse a few drops with peppermint, or apply to your temples, and let the fog lift away to clarity. Experiencing muscle and/or joint soreness? Add a couple of drops with Wintergreen, or better yet, Deep Blue Rub, and apply to affected areas.
Emotioanlly, Douglas Fir promotes a positive mood and sense of focus. This oil is also known as the oil of "generational wisdom". Are you heading home for the holidays? You know how the time with family starts off well, then as time passes, feelings of frustration and disconnect seeps in? Take a moment to find a quiet place, apply a few drops to your spine or the bottom of your feet, and meditate for a few minutes. Allow your mind to calm, and allow the oil to help bridge that generational gap that often times can be found at family gatherings. Douglas Fir will not only open your mind and allow you to feel more connected, but it will also help you feel grounded in your own sense of self.
If you are experiencing avoidance, too much distraction, can't relax, or are in constant need of activity to calm you, Douglas Fir can help.
This oil pairs well with Cedarwood, Vetiver, Bergamot, and Wild Orange.
Here's a fun diffuser blend to tuck away and use with doTERRA's amazing Holiday Joy

Next up, is the fantastic White Fir!
White Fir is steam distilled using the needles of the tree, and can be found in doTERRA's TerraShield bug repellent. It blends well with Lavendar, Frankincense, and Bergamot, and has top properties that include:
*Analgesic
*Antiarthritic
*Antiseptic
*Stimulant
*Antioxidant
One of my favorite ways to use White Fir is to mix it with doTERRA's unsceneted hand and body lotion as well as adding some Aroma Touch. After a good workout, or a long day of working on my feet, it soothes my muscles and relaxes my mind at the same time.
Other ways to use this oil are to diffuse to help kill airborne pathogens, apply to chest to ease breathing, diffuse during cold and flu season to help boost your immune system, apply over your bladder to soothe painful urination, and massage topically to achy joints and muscles.
Emotionally, White Fir, as with many tree oils, is grounding. Imagine a tree, and how it's roots hold it to the ground, yet the branches and leaves raise upwards and out, recieving sunshine and nature's goodness. White Fir grounds your emotions similar to the way a trees roots hold it steady to the ground. At the same time, this oil allows you to open up and go from blocked, to receiving.

Finally, if you are not currently a doTERRA customer, this is a great opportunity for you to try new oils! I will be placing a group order at the end of each day, so please let me know if you would like to try these two for yourself.
Sunday, October 2, 2016
Patons Iced Yarn Review

My local JoAnn Fabric and Crafts store was clearancing out a bunch of Patons Iced Yarn, and of course, I couldn't pass up a good deal, especially since there was a coupon for 25% off my total purchase on top of the already discounted price! I had no idea what I was going to make with this yarn when I purchased it, and to be honest, until I saw it sitting in the clearence bin, I never really noticed it. The shiny silver specks woven into the yarn caught my eye. The feel of it was a bit....itchy....at first, but there are many yarns that feel as though they may itch, but when worked up, they feel very soft and comfy.
4 skeins came home with me, and I decided to work up my own cowl pattern. I will be writting the pattern for this, so be on the look out for it's release!
Patons Iced is 3.5oz, 98 yards, or 67% acrylic, 30% wool, and 3% polyester. Even though there are sections of yarn that thin out, this yarn is considered super bulky. From the outside, that seems pretty obvious. I was actually a bit throw off by how thing the yarn gets. It goes down to a medium weight, and then flows back into the super bulky. I used a 10mm hook as I worked.
The pros of this yarn is that it works up really well. It flows over the hook easily, and even in the sections that aren't as bulky, it's not difficult to keep your stitches consistant. The fact that it is verigated in size actually gives whatever you are working on a really fun look. The silver sparkley piece that is woven into the yarn is extra fun! Who doesn't love shiny things? It also lays very nicely when your work is done. It's not stiff, and certainly doesn't itch at all like I thought it would.
The cons, the skein is small. It took almost 2 skeins of yarn for the cowl I made. The other con is that, if you need to frog your work, it doesn't always pull apart easily.
In the end, the pros far outweigh the cons. I am glad this yarn caught my eye when it did. I will be sure to work with it more in the future.


If you would like to purchase this cowl, visit my shop at www.etsy.com/shop/SassyGingers
Subscribe to:
Posts (Atom)